Undisthreadness

Sunday, April 22, 2007

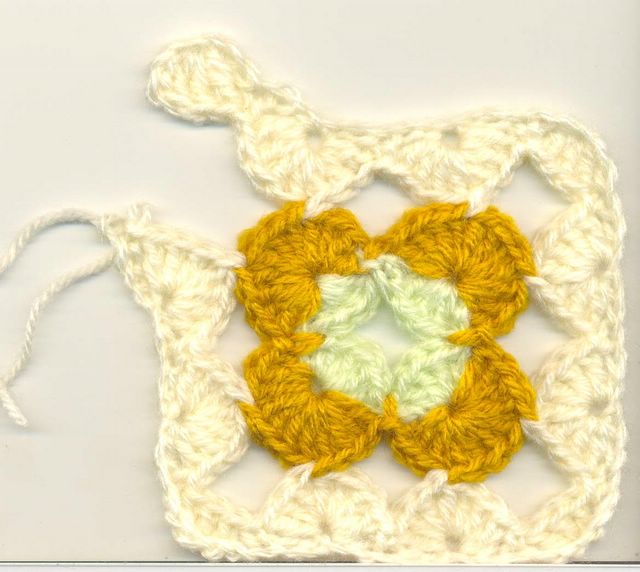
Four-Triangles Square

A square for math-loving crocheters, LOL

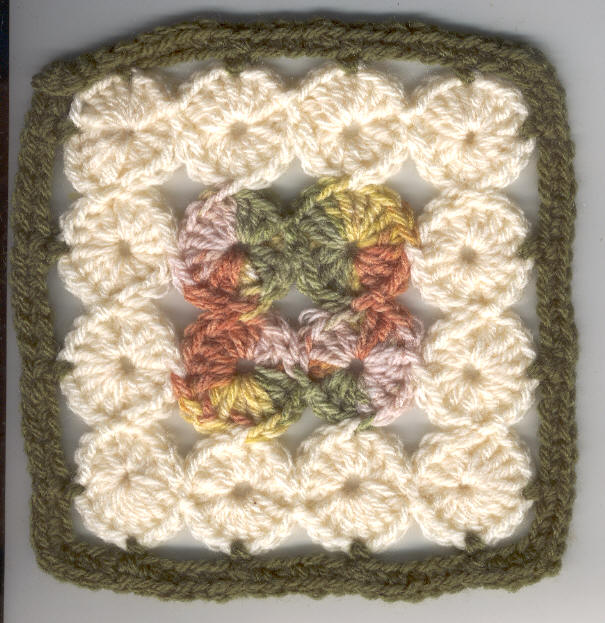
I've created this square for a granny exchange in 2002. It allows for many variations. You can do it in single crochet, as in the pattern below. You can also make it in tunisian (afghan) stitch. You even don’t need a special hook; for so few stitches you can use your regular crochet hook.

Usually I make this square with 3 colors: one varigated, two solids. Colors A, B and C. The samples were made with Brazilian Familia acrylic yarn (sport weight??? It’s a tad thinner than worsted weight) and a 4-mm hook (F? G? I will never learn the American letter system.)


With color A, ch 12.

1st row: Beginning in the second ch from hook, make 11 sc. Ch 1, turn.
2nd row: Sc, inserting the hook through the back loop. Make 9 sc, 1 decrease (insert hook in the first st, pull a loop; insert hook in the second st, pull another hook; yo, pull through the three loops on hook) (total = 10 stitches). Ch 1, turn the work.
3rd row: 1 dec, 8 sc (work always in the back loop, in all rows) (total = 9 st). Ch 1, turn.
4th row: 7 sc, 1 dec (total = 8 st). Ch 1, turn.
5th row: 1 dec, 6 sc (total = 7 st). Ch 1, turn.
6th row: 5 sc, 1 dec (total = 6 st). Ch 1, turn.
7th row: 1 dec, 4 sc (total = 5 st). Ch 1, turn.
8th row: 3 sc, 1 dec (total = 4 st). Ch 1, turn.
9th row: 1 dec, 2 sc (total = 3 st). Ch 1, turn.
10th row: 1 sc, 1 dec (total = 2 st). Ch 1, turn.
11th row: 1 dec; finish the dec with color B. Ch 1.

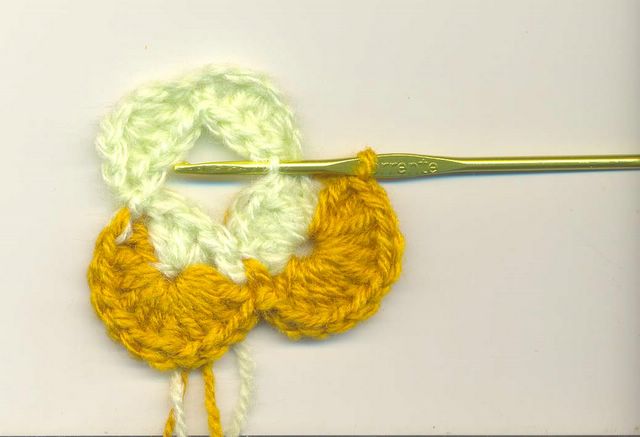
Now you’ll work in the short side of the triangle. Make 11 sc with Color B - one sc in each row of the first triangle. Ch 1, turn.

Repeat from 2nd to 11th row to make the second triangle. Take care to make all decreases at the same side - the decreases are always at the longer sides of the triangles; look at the pictures.

Take care also to keep the Color A with you, crossing it at the end of each other row, so it will be at the right place when you finish the second triangle without the fuss of cutting yarn, finishing it off and tying it again.

Finish the 11th-row decrease with color A and repeat all the process again to make the third triangle. Keep Color B with you, crossing it with Color A at the end of each other row, etc.

Finish the 11th-row decrease of the third triangle with color B.

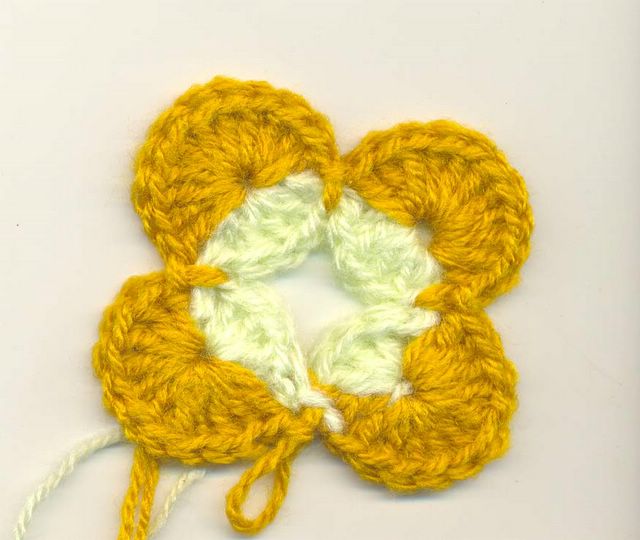
Now, in the fourth and last triangle, you won’t need to take Color A with you; cut it and finish it off.

As in the other 3 triangles, make 1 sc at each row of the previous triangle; but when you reach the 11th sc, before finishing it insert hook in the base chain of the corresponding stitch of the first triangle, pull a loop and finish the 11th sc. Make a slip stitch in the next base chain of the first triangle, turn. This way you “sew” the fourth triangle to the first one as you go.

You’ll make this last triangle the same way you made the other three, but will always end the odd rows inserting the hook in the base chain of the first triangle, pulling a loop and finishing your last sc; and will begin all the even rows with a slip stitch in the next base chain of the first triangle.

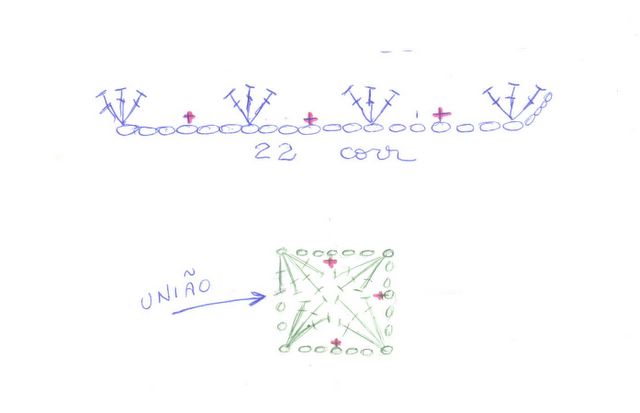
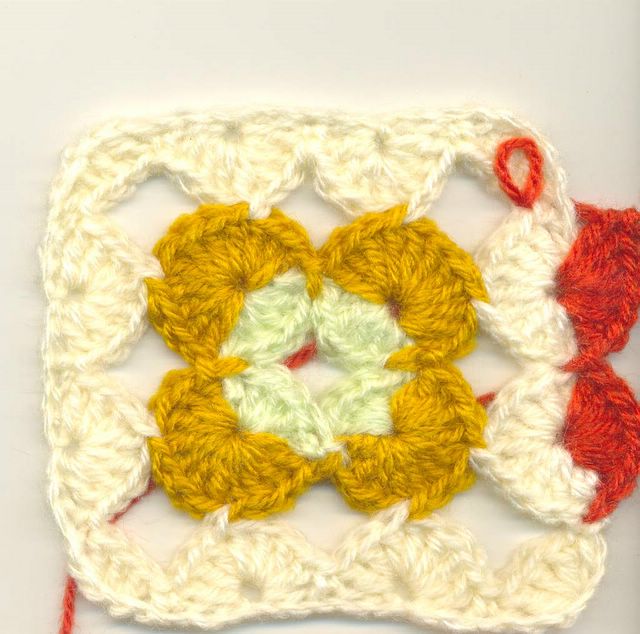
When you finish off the last triangle, the center of your square will be ready. Now, tie Color C in any corner; you’ll make 16 sc in each side of the square, with 2 ch at the corners.

Next row: dc; make 2 dc, 1 ch, 2 dc in each corner.

If the square still doesn’t measures 6”, make new sc or dc rows as needed.

If you follow the same process, you can make the triangles with any sc-related stitch you want. You can even use afghan stitch; since there are few stitches, you won’t need an afghan hook to do that. The violet and off-white square below uses the afghan stitch. Take a look. You can also make the framing rows in camel crochet, to get a nice “puffy” look; I used this stitch in the first sample.

Enjoy yourself.

Thursday, September 14, 2006

4-Pointed Star Square

I couldn’t sleep; so, two posts in so little time...


This square I designed in 2000 for a swap with the remnants of the deceased Compuserve crochet forum. Different color choices can change dramatically this square.

I used sport weight yarn and a 4 mm hook. My square measures 6”.

Color A: Ch 5, close with ss to make a ring.

1st round: ch 1, 12 sc in the ring.
2nd round: ch 1, 3 sc, ch 2, 3 sc, ch 2, 3 sc, ch 2, 2 sc, ch 1, sc at the top of the first sc.
3rd round: ch 1, sc in the ch loop, *3 sc, [sc, ch 2, sc] in the corner loop*; repeat from * to * three times more, ending with sc, ch 2, ss in the first sc.

Color B:

4th round: Sc in one of the corner loops, *ch 8; working in the 3rd ch from the hook, make1 sc, 1 hdc, 1 dc, 1 tr, 1 double-treble (dtr - similar to a treble but beginning with 3 yo), 1 treble-treble (ttr; similar to the dtr, but beginning with 4 yo); sc in the ch-loop at the next corner*; repeat from * to * three times more, ending with ss in the first sc.

Color A:

5th round: Join the yarn to the little loop at the tip of one “arm”, in the same loop make 2 sc; then make 1 sc, 1 hdc, 2 dc, 2 tr, 1 dtr in the corner loop of the center square (make it over the sc of the previous row.) Work now in the base of the next “arm” stitches: 2 tr, 2 dc, 1 hdc, 1 sc in the tip loop. Make the same in the remaining three sides and end with 1 sc in the first tip loop, ss in the first sc.

6th round: ch 3, 1 dc in the same st, 1 dc in each st, making [2 dc, ch, 2 dc] in the corner sc. End the round with 2 dc, ch 1, ss in the top of the beginning chain.

Color B:

7th round: Sc; make 1sc, ch 2, 1 sc in the corner loops.

Color A:

8th round: Sc; make 1sc, ch 2, 1 sc in the corner loops.

Wednesday, September 13, 2006

16-Circles Square


How long since the last post!!!! Four months!!!! What a shame.

I’ll put here some granny squares I designed. All of this began some 10 years ago, when I found the CrochetPartners mailgroup. Maybe it’s the bigger and older crochet list in the Internet.

Back then I joined the Friendship Granny Square Exchange — a swap of 6” worsted-weight yarn granny squares. American crocheters have lots of granny afghan books and patterns, but here in Brazil afghans aren’t a crochet tradition so new patterns are almost non-existant. Then I designed mine, or I would be restricted to the old traditional 3-dc blocks granny.

The square I’m posting today wasn’t the first one I designed — this one is from 1997 — but it’s the one I’m most proud of. The step-by-step pictures were made by my friend Vera Lucia Krauss, known in Brazilian crochet circles as Veralu49, senior crochet- and tricot-sorceress. Many many thanks, Veralu!!!! To make the unusual construction of the pattern more easily understandable, Veralu used different colors for each half-row, but each circle series is made with one and only color.

1st. row (4 circles):

With color 1, chain 22.

In the 4th chain from hook, *3dc; skip 2 st, 1 ss (one quarter circle made), skip 2 st*; repeat from * to * twice more, 3dc in the next chain.


Remove hook from loop, insert hook in the last stitch of the beginning chain (that is now the "head" of the first dc of the first dc group), 12 dc in the same st of the previous 3 dc.


Now you work in the other side of the chain, inserting the hook in the same stitches of the first half-row. Where you made a slip stitch, you will make a new slip stitch inserting the hook through the chain AND the first slip stich.

So, make #ss in the next ss, 11dc in the next 3dc-group#, repeat from # to # three times more, close with a ss, finish off.

2nd row (12 circles):

With color 2, chain 70.


In the 4th chain from hook, *3dc in the same st (a quarter circle made); skip 2 st, 1 ss, skip 2 st, 3 dc in the next st, remove hook from loop, insert it in the 4th dc of the upper left circle of the first row, 4dc in the same stitch you made the previous 3dc (1 half-circle made), skip two base chains, ss, skip two st; make another half-circle, joining it to the second circle of the first row, skip 2 st, ss, skip 2 st*; repeat from * to * three times more, making the last ss in the first quarter circle.


Make 8 dc in the same st you made the previous 3 dc to complete a circle; go on making 7 dc in each half-circle, ss in the ss of the previous half-row (remember to always insert the hook through the ss AND the ch of the previous half-row) and 11 dc at the corners (you will end up with four color 1 circles surrounded by 12 color 2 circles).


Last row:

With color 3, fix the yarn to the 4th stitch of one of the external circles, 5ch, skip 3 dc of the same circle, sc in the next st, 5 ch, sc in the fourth dc of the next circle, 5ch, and keep working this way (making 2 sc with a 5-ch loop in-between in the corners) until you make all the way round. Then make a dc row, with 2dc, 2ch, 2dc at the corners.


I love this square.

There are some videos made by the amazing Brazilian crochet teacher Elaine Tripiano. She talks in Portuguese and if it sounds confusing to you please turn off the sound and watch what she's doing.

Follow the links to the four installments: first part ; second part ; third part ; fourth part. I hope it helps.

Monday, February 20, 2006

Beaded Headband


Note: I found an error in the bead graph. It's corrected now. Excuse me for any inconveniency.

Materials:
Anne thread (similar to Pearl cotton nr. 3), off-white or light beige.
Crochet hook 1,75 mm
152 3-mm seed beads, pearly green.

Size: the sc part is 4.5 cm (1.8") width, 33 cm (13") long.

Abbr.: st (stitch), yo (yarn over), inc (increase), dec (decrease), ch (chain), sc (single crochet), dc (double crochet).

Before you begin crocheting, string all beads in the thread. It's better to string some beads more; I stringed about 160 beads. If you string less beads, you'll have to cut the thread, string more beads and tie the thread again - a tiresome task.

First you make the tying string. You can make a simple chain, but I used a cord pattern from an old crochet book. I'll try to describe it.

You begin chaining 2 stitches; in the second ch from hook you make a sc. Turn the work and look at the stitch you've made. Under the two top loops, you'll see 2 lateral loops. Insert the hook into these two lateral loops and make a new sc. It's a bit difficult to identify these two lateral loops in the first row, but it won't matter if you don't insert your hook into the right loops. Turn the work. Now it'll be easier to see the 2 lateral loops; insert your hook into them and make a new sc. Turn the work.

You can find a good step-by-step picture explanation at the German site Teddy's Handarbeiten.

Keep working this way until the cord has the desired length (mine has 37 cm - 14.5 inches.)

Then ch 3 (= 1 dc), 4 dc in the same stitch (total 5 dc). Turn.
Ch 3 (= 1 dc), 1 dc in the first st, 3 dc, 2 dc in the last st (= 7 dc). Turn.
Ch 3 (= 1 dc), 2 dc in the first st, 5 dc, 3 dc in the last st (= 11 dc). Turn.
Ch 3 (= 1 dc), 1 dc in the first st, 9 dc, 2 dc in the last st (= 13 dc). Turn.
Ch 3 (= 1 dc), 1 dc in the first st, 11 dc, 2 dc in the last st (= 15 dc). Turn.

Now you'll begin to follow the graph. Working in sc, make the first row in plain sc - it's the right side of the headband.

Turn the work, ch 1, 1 sc, then insert the hook in the previous row stitch, yo, pull a loop, pull a bead until it's next to the crochet, yo (catching the thread next to the bead) and pull the loop through the two loops in the hook. Keep working in sc, with a bead in the middle of the row and another in the stitch next to the last one.

The next row is a right side row. First, 6 plain sc. Now, to fix a bead to a right row st you need to insert the hook FROM BACK TO FRONT, yo and pull the loop FROM FRONT TO BACK; the thread will be at the front side of the work. Pull the bead next to the work, yo next to the bead, pull the loop through the 2 loops in the hook. You'll get a twisted stitch, but never mind. Make more two beaded twisted sc and then 6 plain sc.

The 4th row is similar to the 2nd row.

Keep following the graph and repeat the part marked with "repetir' (repeat in Portuguese) until you have 12 5-beads groups. Make one more plaln sc row then work the decreasing dc rows: dec 1 st at each side of the 1st row (13 st), 1 st at each side of the 2nd row (11 st), 2 st at each side of the 3rd row (7 st), 1 st at each side of the 4th row (5 st) then make a group of 5 st together, keeping in the hook the last loops of each stitch, then yo and pull the loop through all loops in the hook.

Then you'll work the second tying string - make the same cord or chain you made at the beginning. Finish off.

I like these tied headbands better than the ones with elastic.

Thursday, February 16, 2006

Litle Granny Square Heart


I wanted a little pretty something to send to my partners in the Granny Square Exchange of the Brazilian list crocheterapia. Then I had this idea, which relates to grannies AND love.

I used Pearl cotton nr. 8 and a 1 mm steel hook.

Measurements: 2,2" width, 2" height

Abbr: ch (chain),. ss (slip stitch), sc (single crochet), dc (double crochet), tr (treble crochet), picot (ch 3, sc on top of previous stitch).

Ch 5, join with ss to make a ring.

1st round: Ch 3, 2 dc in the ring, *ch 2, 3 dc in the ring*, repeat from * to * twice more, ch 1, sc in the 3rd beginning ch (this pb substitutes the 2nd ch and as such must be treated.)

2nd round: Ch 3, 2 dc in the same corner loop (insert hook under the last sc of the previous row, as if it was a chain), *ch 1, [3dc, ch 2, 3 dc] in the next 2-ch loop (corner made)*, repeat from * to * twice more, ch 1, 3 dc in the last 2-ch loop, ch 1, 1 sc in the 3rd beginning chain.

3rd round: Ch 3, 2 dc in the same corner loop, *ch 1, 3 dc in next loop, ch 1, corner in the next loop* , repeat from * to * twice more, ch 1, 3 dc in next loop, ch 1, 3 dc in last loop, ch 2, slip stitch in the 3rd beginning chain.

Shape the heart. †Slip stitch on the next 2 st; ch 1, skip 3 st, in the next st (the center dc of the 3-dc group in the middle of the square side) make [1 dc, ch 1] 5 times, ch 1, skip 3 st, ss in the next st and in the next 3 st; ch 1, turn the work; tr in the ch loop, *ch 1, tr in the next st, ch 1, tr in the next ch loop*, repeat from * to * 4 times more (11 tr), ch 1, ss in the next corner loop†. Don't turn the work; repeat from †to†.

Don't turn the work to make the finishing row. Sc in each of the next 5 stitches (trebles or loops); *1 picot, skip 1 st, 3 sc*, repeat from * to * until the corner loop at the tip of the heart, picot, sc in the same loop and go back the same way, symmetrically, ending with a slip stitch in the beginning of the row. Finish off.

Pretty, huh?

Sunday, February 12, 2006

Brown Cell Cover


After many sunny and rainy days full of work, I got a little time to update my blog.

Since the blue cover is a bit too flashy, I choose to make a soberer one - I used brown thread, not that I particularly love brown, but because for a lot of random reasons I have quite a few brown pants.

To brighten it up a little, I thought: why don't add color using the peruvian or tapestry technique of jacquard crochet? So I graphed a simple diamond pattern and choose light beige, burgundy and dusty green as the secondary colors.

The pattern follows the general guidelines of the blue cell cover; I used dark brown Anne thread (Anne is a Brazilian thread similar to Pearl cotton nr. 3) and a 1.75 mm hook.

Beginning with 4 chains, I made 12 straight sc rows then a circular row of sc around this rectangle - 12 sc on the long side, 4 on the other side of the beginning chain, 12 on the other long side, 4 to the end - 32 sc. I didn't finished the round with a slip stitch; just marked the first stitch (I use a paper clip, any method will do, even a piece of different color thread) and kept working in continuous rounds.

So, on the second circular round I began to follow the graph. The peruvian jacquard technique consists in working the single crochets of one color over the other color thread, inserting the hook through both strands of the previous row stitches. This way you won't have "loose" threads on the wrong side of the work to mess up the keyboard of your cell phone. As in all multicolored crochet work, you finish a stitch with the thread of the next color.

When I ended working the graph, I kept making sc rounds with the brown thread. Since jacquard sc is more "tight" than dc, I felt the need to increase the number of stitches to accommodate my cell phone shape. So I increased 1 st at each "corner" of the cover, getting a total of 36 stitches this way. I kept working on them until the 28th round.

To finish the 28th round I used a slip stitch on the next st; then I chained 1, turned the work and began to make the flap.

The brown cover flap is shorter than the blue one, to avoid covering the jacquard part. See the pattern for the blue cell phone cover; in the brown one, I began to decrease at the 22nd row. I used the same brown thread to make the finishing row around the flap with the button loop.

This time I used a coconut little button: the right size, the right color, the right look.

The belt strap is the same as in the blue cell phone cover.

I sewed a little dark metal ring in each side of the cover and made a long strap (128 4-dc rows); put a "mosquetao" (what's the name of this little hook in English? See the photo) at each end and now I have a versatile cell phone cover. I can hang my phone or use it in my belt.

Monday, January 23, 2006

Blue cell-phone cover


A few time ago I got a new cell phone of the tiny type; a plain Nokia 1108, without bells or whistles. Its gray plastic shell looks prone to scratches; so it needs a cover.

I looked for one of my taste in several towns and cities - Borda da Mata, Pouso Alegre, Campinas, Indaiatuba, São Paulo, Rio de Janeiro. I could only find clear plastic covers (I hate plastic) with fragile clamps (I hate fragile clamps), or black ones in natural or synthetic leather (I hate black), or too frilly and flurry ones - Hello Kitty, Monsters Inc. and other childish patterns (I'm not a child anymore and I think that even when I was a child I wouldn't use anything so gaudy.)

Then I thought: well, I could crochet a cell cover for me. So I searched through my Anne thread stash, took a 1.75mm steel hook and got to work.

This blue cell cover was the first I made.

Beginning with 4 chains, I made 12 sc rows. Then came a round of sc around the rectangle - 12 sc on the long side, 4 on the other side of the beginning chain, 12 on the other long side, 4 to the end - 32 sc. I finished the round with a slip stitch.

On the next round: ch 3 (they stand for a dc), make a dc round. Finish this round with a slip stitch, ch 1, turn the work. Next, a sc row on the wrong side of the work. Finish with a slip stitch; ch 3, turn the work. The next round is a dc round on the right side of the work. Make a total of 17 round this way - one dc round on the right side, one sc round on the wrong side. The 17th round is a sc round.

Finish the 17th round with a slip stitch; one slip stitch more on the next stitch; ch 1, turn the work. Then make 14 sc to begin the closing flap. Make 24 rows of 14 sc; from the 25th to the 28th row, decrease 1 stitch at each side of the flap until you have 6 stitches. Finish off.

With another color thread (I used a neon shades varigated), make a sc row around the opening and the flap. After the 6 sc of the flap end, ch 12, turn the work, slip stitch in the 6th sc, turn the work, 15 or 16 sc in the 12-chain loop. Complete the sc row around the flap.

(After I finished my cell cover, I thought that I could have crocheted, in this finishing row, a loop on each side of the cover to attach a strap and hang the cell phone from my neck or shoulder. Since I didn't make these loops, I'll sew metal rings on each side with thread and needle. A cell phone cover must be versatile!)

I put the phone inside its cover, marked the right place for the button, then sewed the button. I used a very pretty pearly porcelain button - it belonged to an old cardigan and I kept it for some proper occasion...

Now, on the back side of the cover, make 12 sc inserting the hook around the central sc's of the last row before the beginning of the flap. On these 12 stitches make 18 sc rows; finish off leaving a long tail and sew this belt strap securely with a blunt needle. Look at the picture.

I liked my new cell cover so much I decided to make another - a sober brown one, in tapestry crochet. This one deserves a longer explanation, so it will have to wait.