Undisthreadness

Monday, January 23, 2006

Blue cell-phone cover


A few time ago I got a new cell phone of the tiny type; a plain Nokia 1108, without bells or whistles. Its gray plastic shell looks prone to scratches; so it needs a cover.

I looked for one of my taste in several towns and cities - Borda da Mata, Pouso Alegre, Campinas, Indaiatuba, São Paulo, Rio de Janeiro. I could only find clear plastic covers (I hate plastic) with fragile clamps (I hate fragile clamps), or black ones in natural or synthetic leather (I hate black), or too frilly and flurry ones - Hello Kitty, Monsters Inc. and other childish patterns (I'm not a child anymore and I think that even when I was a child I wouldn't use anything so gaudy.)

Then I thought: well, I could crochet a cell cover for me. So I searched through my Anne thread stash, took a 1.75mm steel hook and got to work.

This blue cell cover was the first I made.

Beginning with 4 chains, I made 12 sc rows. Then came a round of sc around the rectangle - 12 sc on the long side, 4 on the other side of the beginning chain, 12 on the other long side, 4 to the end - 32 sc. I finished the round with a slip stitch.

On the next round: ch 3 (they stand for a dc), make a dc round. Finish this round with a slip stitch, ch 1, turn the work. Next, a sc row on the wrong side of the work. Finish with a slip stitch; ch 3, turn the work. The next round is a dc round on the right side of the work. Make a total of 17 round this way - one dc round on the right side, one sc round on the wrong side. The 17th round is a sc round.

Finish the 17th round with a slip stitch; one slip stitch more on the next stitch; ch 1, turn the work. Then make 14 sc to begin the closing flap. Make 24 rows of 14 sc; from the 25th to the 28th row, decrease 1 stitch at each side of the flap until you have 6 stitches. Finish off.

With another color thread (I used a neon shades varigated), make a sc row around the opening and the flap. After the 6 sc of the flap end, ch 12, turn the work, slip stitch in the 6th sc, turn the work, 15 or 16 sc in the 12-chain loop. Complete the sc row around the flap.

(After I finished my cell cover, I thought that I could have crocheted, in this finishing row, a loop on each side of the cover to attach a strap and hang the cell phone from my neck or shoulder. Since I didn't make these loops, I'll sew metal rings on each side with thread and needle. A cell phone cover must be versatile!)

I put the phone inside its cover, marked the right place for the button, then sewed the button. I used a very pretty pearly porcelain button - it belonged to an old cardigan and I kept it for some proper occasion...
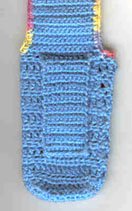
Now, on the back side of the cover, make 12 sc inserting the hook around the central sc's of the last row before the beginning of the flap. On these 12 stitches make 18 sc rows; finish off leaving a long tail and sew this belt strap securely with a blunt needle. Look at the picture.

I liked my new cell cover so much I decided to make another - a sober brown one, in tapestry crochet. This one deserves a longer explanation, so it will have to wait.

Saturday, January 21, 2006

The pillow-cover border


I ended up using an idea from Jil Sousa. Thank you Jil!!!

I think the result is ok - a good contrasting effect between the frilly and open border and the more sober and dense pillow cover.

Friday, January 20, 2006

Pillow cover


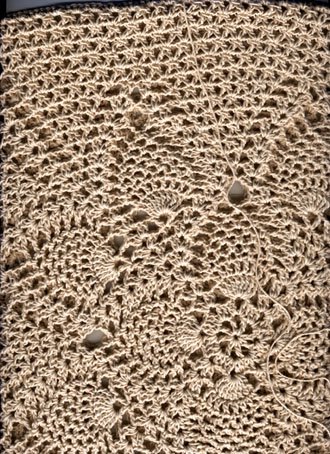
This is a pillow cover (front and back) I'm finishing for the pillow-cover swap of the Brazilian crochet list crocheterapia

I used 100% cotton string nr. 2/4 (the thinnest manufactured here), Supremo brand, and a 2.5 mm aluminium hook. I adapted Priscilla Hewitt's 'Square Pineapple Doily' from Priscilla’s Crochet site - I made one pineapple series more and kept adding delta-stitch rows until I got to the size required - 45 cm or 17.5 inches.

I have a doubt: I wish to put a border around the pillow cover. But I tried a fan stitch border and it didn't look right with the pineapples and delta-stitch rows. If someone has any suggestion, I think I could use some good ideas...

Sunday, January 15, 2006

Lacy diamond square

I haven’t posted anything for quite a time! I went to Santo André (São Paulo State) to visit some crocheter friends and to Rio de Janeiro to see a friend and my mother.

A crochet meeting is something I recommend to everybody! There isn’t anything better in the world than to talk for hours (or days!!!) about crochet with people who understand what is a dc!!!

Today I’ll post a pattern I designed in september 2001 for an international crochet square swap.


Size: 15 cm (6”)

Material: sport weight yarn, 4-mm hook (G). 3 Colors: 1 = pastel varigated; 2 = violet; 3 = white.

Abbreviations: rd = round, ch = chain, sc = single crochet (American), slst = slip stitch, dc = double crochet (American), hdc = half double crochet

With Color 1, Ch 4. Join with sl st to form a ring. Ch 1.

1st round: [sc, ch 2] 3 times in the ring, sc in the ring, ch 1, sc in the top of the first sc (you are joining the round with a sc instead of a sl st; this sc should be interpreted as a last ch.). Ch 1.

2nd round: make 1 sc around the closing sc of the previous row (remember, it’s to be looked at as a ch, not as a sc!), sc in the next sc, *[sc, ch2, sc] in the next 2-ch loop, sc in the next sc*, repeat from * to * twice more, sc in the next loop, ch 1, sc on top of beginning sc. (total of 12 sc with 4 2-ch loops at the corners).

3rd and 4th rounds: beginning and ending each round as in the 2nd round, make 1 sc in each sc, [sc, ch 2, sc] in the corners. FO.

Join Color 2 to the 4th sc of any side of the square.

5th round: Ch 3 (stands for 1 dc), ch 3, sc in the corner loop, ch 3, *[dc, ch 4, dc] in the 4th sc of the next side, ch 3, sc in the next corner loop, ch 3*, repeat from * to * twice more, dc in the same stitch you joined Color 2, ch 2, dc in the 3rd beginning chain. (you are joining the round with a dc instead of a ch 2, sl st; this dc should be interpreted as 2 ch.) Ch 1.

6th round: 2 sc on loop, *1 sc in next dc, 3 sc on loop, 1 sc on next sc, 3 sc on loop, 1 sc in next dc, [2 sc, ch 2, 2 sc] on corner loop*, repeat from * to * twice more, 3 sc on loop, 1 sc on next sc, 3 sc on loop, 1 sc in next dc, 2 sc on loop, ch 1, sc around the first sc.

Finish the last 6th-rd sc with Color 3.

7th round: With Color 3: ch 3 (stands for 1 dc), 1 dc in the next sc, *ch 2, group of 2 dc (yo, insert hook in the same stitch of the last dc, pull a loop, yo, pull a loop through 2 loops on the hook, yo, skip 2 st, insert hook in the 3rd stitch, pull a loop, yo, pull a loop through 2 loops on the hook, yo, pull through all the loops on the hook)*; repeat from * to * 3 times more; ch 2, group of 2 dc, inserting the hook for the 2nd dc in the 2-ch loop at the corner, ch 3, group of 2 dc (make the first one in the corner loop, the second one in the first sc of the next side); repeat from * to * 4 times; keep working this way until you finish the round, with ch 2, 1 hdc on top of the first ch-3.

8th round: Similar to 7th rd; but there’s one more 2-dc group in each side of the square (look at the picture).

9th round: Sc.